Showing posts with label tutorial. Show all posts

Tuesday, 21 October 2014

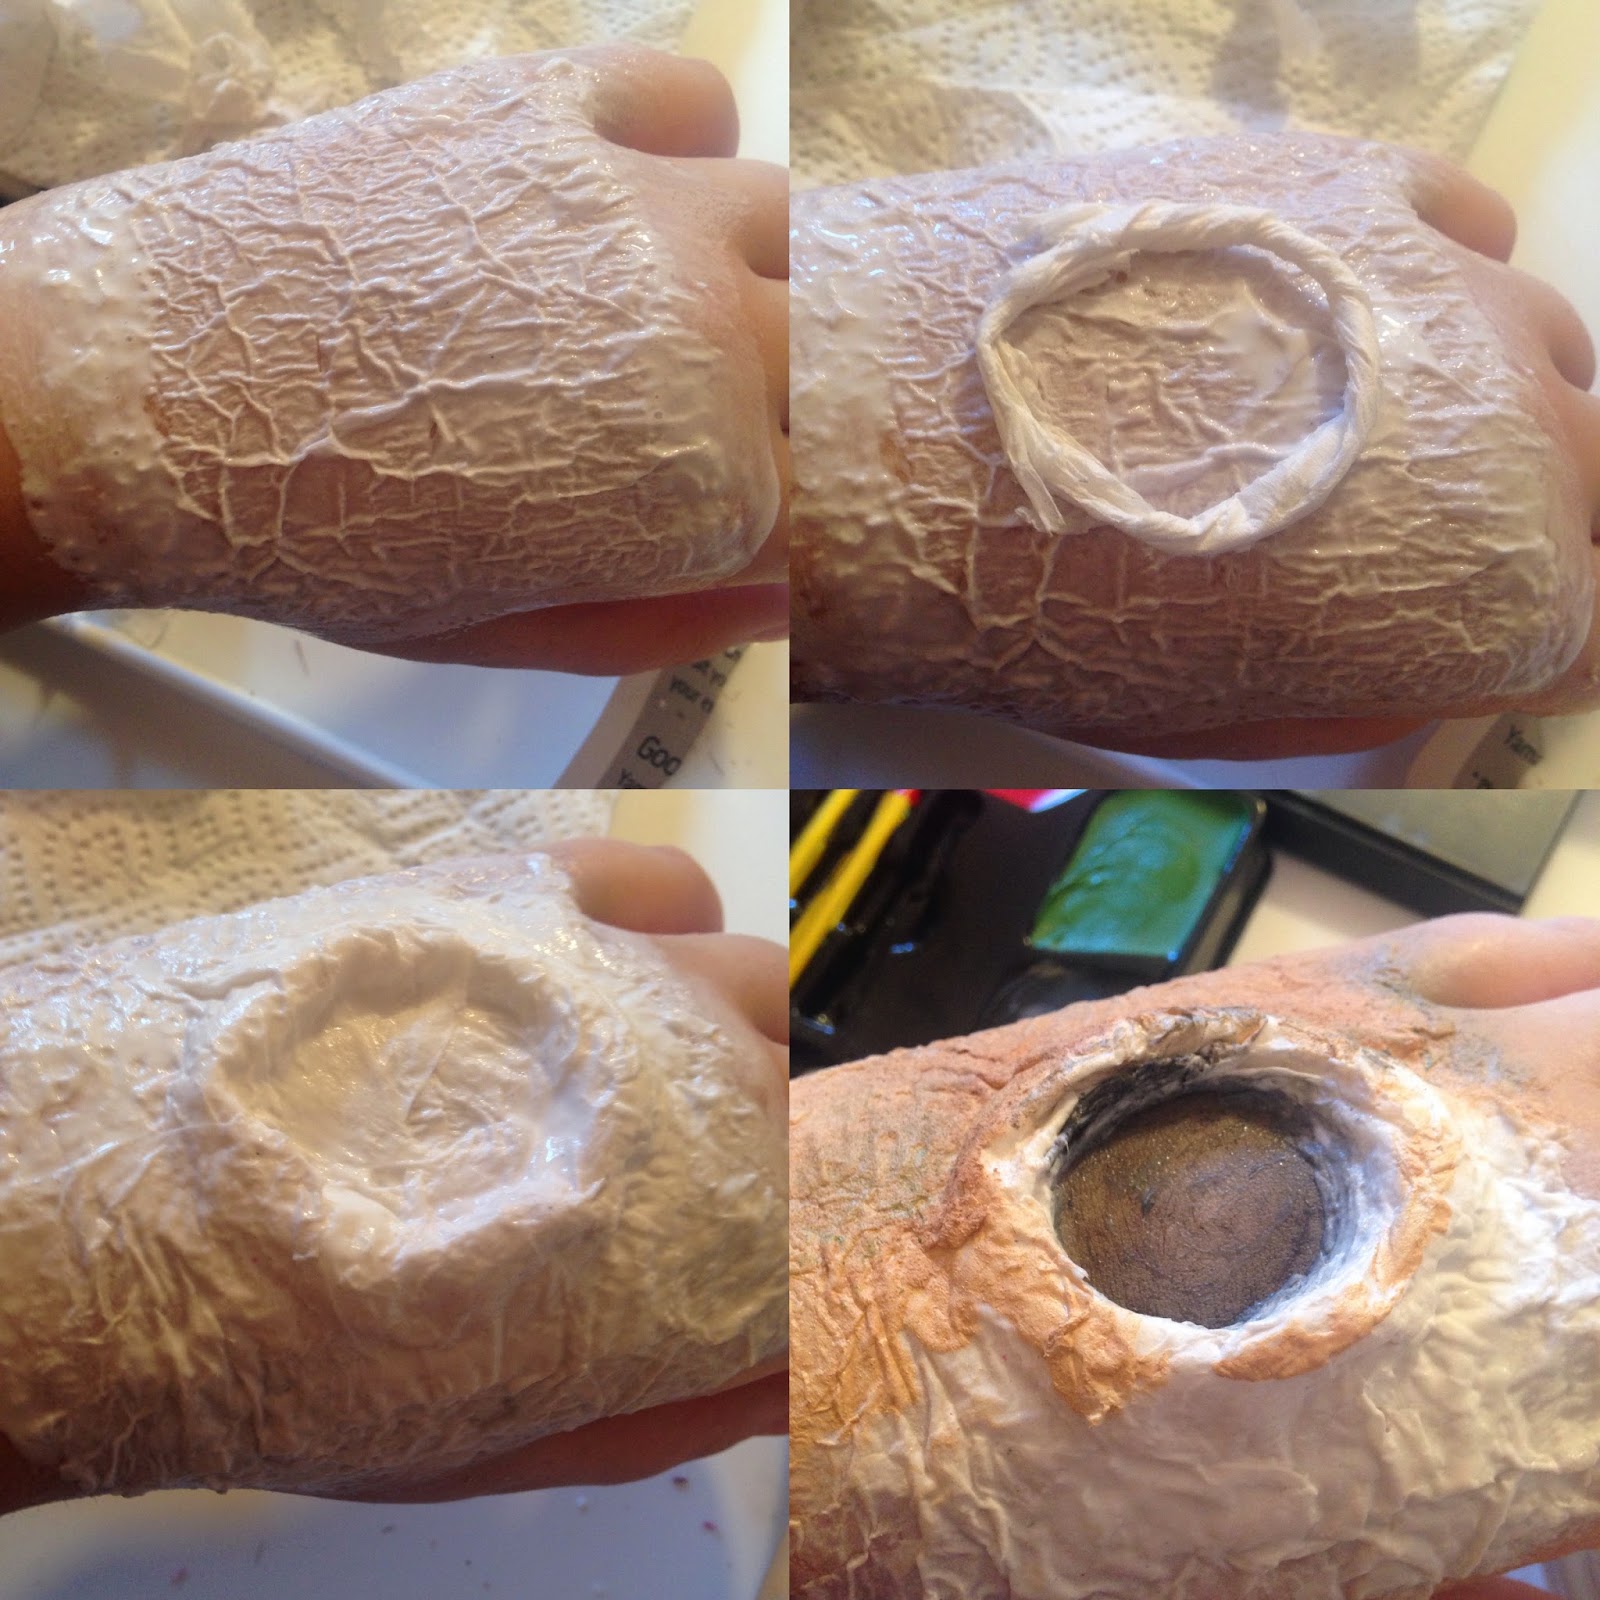
easy zombie wound tutorial ❤


As Halloween is just around the corner I decided to do something a little bit more creepier than my usual make-up and of course I had to do a zombie wound. As usual I will list all the products I used to create this look below and if you have any questions or comments please leave them below or sent me a tweet.


Products used;

PVA glue
Tissue paper/kitchen roll
Fake Blood
Black nail varnish 
Red nail varnish 
Foundation and/or concealer 
Setting powder or Baby powder
Brown, black and blue eyeshadow 


  • first put one layer of tissue on the area where you plan to make the wound
  • roll up pieces of tissue into sausage shapes and map out the wound
  • add multiple layers of tissue and PVA glue over the wound outline to make it look more seamless
  • once the tissue paper is dry cover the tissue with a foundation or a concealer and carefully cut the center of the wound, then fill the center of the wound with a black eyeshadow or facepaint.


  • set the foundation or concealer with a setting powder or baby powder this help reduce any shine from the PVA glue.  Add red nail varnish to the rim of the wound and add small amounts of black to the rim to make it look like congealed blood
  • fill the wound with fake blood, as much or as little as you like
  • add black, brown and blue eyeshadow to your new zombie skin, the more you add the more dead you look.

If you would like to see more tutorials comment bellow or send me a tweet!


Sunday, 5 October 2014

Quick and easy halloween make-up | POP ART! ❤


This Halloween why not try something different, embrace the 1950s become living pop art!  This is super easy and looks great with a plain outfit or a cute 50s dress.  This is perfect if you are like me, someone who loves Halloween but doesn't want to spend too much on special make-up and costumes.  This look was completed with three basic products and two of them you probably already own. 


Products used;

Black eyeliner, this can be pencil, gel or liquid.  I found liquid to be the easiest but I did use a mixture of the three.  Use the black eyeliner to boldly fill in your eyebrows, don't worry about having a scouse brow it will look good soon.  Pick one side of your face and draw a line from your ear to your chin following the shape of your jaw bone,  also draw a line around your nostril, make sure its on the same side as the jaw bone line.  Add a line down the centre of your nose and finishing at the tip and to finish line your lips.

White face paint, I bought a snazaroo cake bar from ebay for less than £3. Before you add the dots make a tear drop shapes under one eye and then with the back of a make-up brush or pencil add white dots all over your face, try to make them as opaque as possible.

Red Lipstick, I think this is step is self explanatory but apply red lipstick.  Once you have applied the lipstick add someone which highlights with the white face paint. 

Blue eye shadow, I used to blue eye shadow to fill in the tear shapes I made with the white face paint, try to use the brightest blue you have.  Once you have done that outline the tear shapes with a black liquid liner and you are finished. 


To complete the look add a black or dark brown bob wig or have a cute 50s hair style, I used 'Chestnut' wig from Geisha Wigs.


Friday, 22 August 2014

Purple glitter smokey eye ❤


The last tutorial I did I got amazing feedback so I thought I would do another one this time more gothic and with glitter.  I hope you enjoy reading and find it helpful.


  • Before any smokey eye I always do my eyebrows first just so I have a better idea on how my make-up with look complete
  • Apply tape from the end of your eyelid to the end of your eyebrow and apply a eye shadow base or colour correcting concealer 
  • Apply your usual crease colour lightly, this step may seem pointless but it makes everything look better later
  • With a black eye liner pencil roughly liner line your lid and add black to the outer lid, it is hard to explain but you can see it in the picture.


  • Blend the eye liner with a brush and it should blend to a light black/grey colour, don't be tempted to rush and add more black straight away just keep on blending until you have a nice transition 
  • Once you have fully blended the eye liner slowly add black to the crease and blend, build up colour slowly until you have a solid black and blended crease
  • Pack a deep purple eye shadow on your lid, don't worry about fallout that can be cleaned up later
  • Blend the deep purple and black together to make it look seamless
  • You may thing this all looks a mess right now, trust me it will look fine soon!


  • Peel off the tape and clean up all the fall out with make up remover and apply your foundation.  Try and pick a foundation what gives you a flawless finish so all the attention is on your eyes and not any imperfections
  • Add a line of glitter glue then purple glitter to your lashline, any fallout can be brushed away
  • then the rest is up to you! contour, blush and lipstick is all up to your personal taste but I decided to go with light contour, peach blush and deep purple lipstick with a black lipgloss on top.

If you would like to see more tutorials comment bellow or send me a tweet!


Friday, 8 August 2014

Ombre lips tutorial ❤


I have been asked a few times how I do my black and red ombre lips so I thought I would do a little step by step guide in how I do it and what products I used.  


  1. cover your lips with your foundation, concealer or lip eraser, this step isn't essential but it may help clean up later on!
  2. line your lips with a black lip or eye pencil and add extra black to the corner of my lips
  3. apply lipstick straight from the bullet or with a brush and blend the colours together with your lips 
  4. clean up is optional! if you want a precise look you can go back with your concealer brush and some concealer and clean up the edges
  5. next step is personal choice, I love to add gloss with any ombre look but that is totally up to you.


Products I used;
Jelly Pong Pong 2 in 1 eyeliner & shadow pencil in black
MAC Ruby Woo lipstick 
Gerard Cosmetics lipgloss in Candy Apple


I hope you enjoyed this tutorial, let me know if you try it out!


Friday, 25 July 2014

beginners guide to a smokey eye & winged eyeliner ❤


I always get asked how to do a easy smokey eye so I thought I would do my first ever in depth tutorial on how to do it! I hope you enjoy it, please leave a comment if you would like to see more of these.


  • Start off with a clean, moisturised and primed face, today I used Nivea day cream and Revlon Photo Ready Primer.
  • Apply a small strip of tape from the end of your eyelashes to the base of your eyebrows, any tape can be used but I suggest a microporous tape or something similar. 
  • Prime your eyelids to prevent creasing and to increase the longevity of your make-up, I primed my eyelids with Benefits lemon Aid. Setting your primer with a loose powder or nude eye shadow makes blending shadows easier. 
  • This step is hardly noticeable but makes a big difference! Use your contour power in the crease of your eye and slowly blend up towards the brow bone, this will make your smokey eye look more blended and more easy to create.


  • Start off with a light brown colour and in small circular motions apply eye shadow in the crease, at first it may feel pointless but trust me it will all come together. 
  • Apply a slightly darker brown and do the same again, keep on blending and adding more brown if needed.
  • Slowly start to add more and more darker browns and intensify to your liking.


  • Apply a nude eyeshadow to the lid of your eye to open and brighten your eyes.
  • The final eyeshadow is black, black eyeshadow should always be last as it is a pain to blend, but remember the tiniest bit goes a long way.
  • Now my favourite part, eyeliner. I love winged eyeliner and I think I'm pretty good at it but this makes it so much easier and precise.
  • Keep the tape on and apply your eyeliner as usual and when you remove the tape you have a sharp, clean line.


  • Apply lots of mascara and/or false lashes.
  • Now theses steps are all up to you, I personally fill my eyebrows in before foundation and concealer.
  • Recently my acne has settled down so I don't need much coverage, I just need highlighting and some acne scars covering. 
  • Don't forget to set your face with powder, it makes your makeup last longer and can reduce shine. 
  • The rest is all you to your own personal taste, I personal love to contour the hell out of my checkbones, nose and forehead. Add blush and a highlighter on the tops of your checkbones and on your brow bone.  Don't forget to add some lipstick and you are complete. 


Products I used (in order);
Nivea day cream
Revlon photoready primer
Benefit Lemon Aid
AVON supershock eyeliner in black (upper lashline)
Illamasqua eyeshadow in Heroine
REVOLUTION eyeshadow palette in Iconic 3
Illamasqua gel eyeliner
NYC eyebrow pencil in Brown
REVOLUTION concealer in 01 fairest 
Collection lasting perfection concealer light 2
Lancome Hypnose Star in brown (top lashes)
Clinique even better mascara (bottom lashes)
Sleek blush in Flamingo 
MUA lipstick in shade 3