Thursday 18 December 2014

reindeer cosplay/makeup ❤


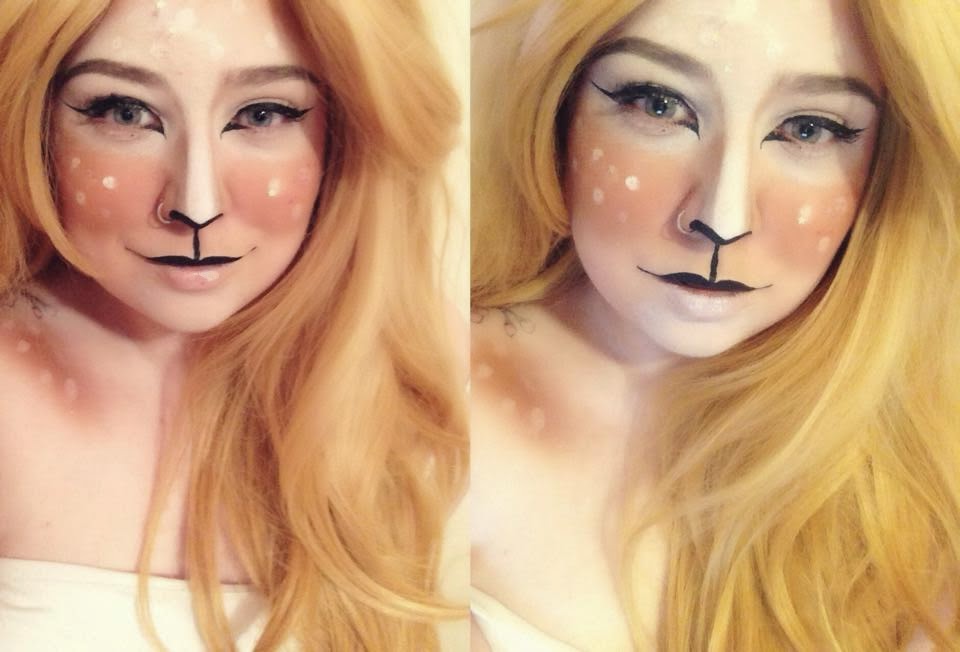
Just because it is Christmas doesn't mean I have to do "normal" makeup! boredom hit me so I became a reindeer and I kinda like the result. As usual I will list all the products used to create this look and if you have any questions please don't hesitate to leave a comment or tweet me.

Products used;

MAC Studio Fix Fluid in NC20. Due to the fact I am ghostly pale I used a foundation darker than my normal shade so the highlighted sections look brighter.

MAC Pro Longwear concealer in NC20.

Snazaroo Facepaint in White. I used a slightly damp stippling brush to apply a thin layer of facepaint over my eyes, forhead, bridge of my nose and my chin to create a highlight. If you have a darker skintone that me you can use a lighter concealer in these sections instead of facepaint.

NARS laguna bronzer. I applied the bronzer all over my cheeks kinda like a blush but really heavy and I also applied the bronzer around my temple and a small patch on my chest. 

Illamasqua Eyeshadow in Heroine. I used the eyeshadow to contour my face as usual and to heavily contour my nose.

Anastasia Beverly Hills Dipbrow Pomade in soft brown.  I filled in my eyebrows as normal, it was a little tricky to do on top of the facepaint.

NYX Jumbo Eye Pencil in Milk. I applied dots on top of the bronzer, you can do as much or as little as you like.

Revolution Amazing Eyeliner in black. I used this to create a simple winged eyeliner with a pointed inner corner, a cute nose and to fill in my top lip.


Thursday 27 November 2014

Sigma beauty brush cleaning mit dupe ❤

(I have a new wig! can't wait to do a Poison Ivy cosplay with this)

If you are a makeup junkie like me you have a million makeup brushes for a million different things, its great until you have to clean them all! I have done a blog post on how I clean my makeup brushes which is with handsoap and the palm of my hand but that can make your hands very sore and it takes me so long to clean them all.  When Sigma announced the brush cleaning mit it was like all prayers had been answered and then I saw the price, to buy the mit in the UK it is about £35 (yes £35!).  


I decided to have a look around on eBay and I found this beauty, it is a silicone oven glove from China and it cost £1.79.  It may not have all the fancy bumps as the Sigma one but it does the same job, It cut my brush cleaning time by half and I no longer have sore hands.  


Tuesday 21 October 2014

easy zombie wound tutorial ❤


As Halloween is just around the corner I decided to do something a little bit more creepier than my usual make-up and of course I had to do a zombie wound. As usual I will list all the products I used to create this look below and if you have any questions or comments please leave them below or sent me a tweet.


Products used;

PVA glue
Tissue paper/kitchen roll
Fake Blood
Black nail varnish 
Red nail varnish 
Foundation and/or concealer 
Setting powder or Baby powder
Brown, black and blue eyeshadow 


  • first put one layer of tissue on the area where you plan to make the wound
  • roll up pieces of tissue into sausage shapes and map out the wound
  • add multiple layers of tissue and PVA glue over the wound outline to make it look more seamless
  • once the tissue paper is dry cover the tissue with a foundation or a concealer and carefully cut the center of the wound, then fill the center of the wound with a black eyeshadow or facepaint.


  • set the foundation or concealer with a setting powder or baby powder this help reduce any shine from the PVA glue.  Add red nail varnish to the rim of the wound and add small amounts of black to the rim to make it look like congealed blood
  • fill the wound with fake blood, as much or as little as you like
  • add black, brown and blue eyeshadow to your new zombie skin, the more you add the more dead you look.

If you would like to see more tutorials comment bellow or send me a tweet!


Saturday 11 October 2014

green smokey eye ❤


If you follow me on Twitter or Instagram you will know I'm a big nerd and I love video games, last week Alien: Isolation was released.  To show my love towards the game I decided to create a green and black smokey eye with a hint of glitter.  As usual I will list all the products I used to create this look below and if you have any questions or comments please leave them below or sent me a tweet. 

Products used;
Illamasqua Matte Veil primer
Illamasqua Rich Liquid foundation in 115
Brow bar to go
Collection Lasting Perfection concealer in light 
Illamasqua eyeshadow in Heroine for contour 
Bourjois delice de poudre bronzer
Illamasqua eyeshadow in Pivot 
Illamasqua eyeshadow in Obsidian
ELF HD setting powder 
NARS Deep Throat blush
Essence XXXL longlasting lipgloss in 06
Green glitter from ebay (I used eyelash glue to stick the glitter to my lid)
Haute Couture eyelashes in Flirt 


Sunday 5 October 2014

Quick and easy halloween make-up | POP ART! ❤


This Halloween why not try something different, embrace the 1950s become living pop art!  This is super easy and looks great with a plain outfit or a cute 50s dress.  This is perfect if you are like me, someone who loves Halloween but doesn't want to spend too much on special make-up and costumes.  This look was completed with three basic products and two of them you probably already own. 


Products used;

Black eyeliner, this can be pencil, gel or liquid.  I found liquid to be the easiest but I did use a mixture of the three.  Use the black eyeliner to boldly fill in your eyebrows, don't worry about having a scouse brow it will look good soon.  Pick one side of your face and draw a line from your ear to your chin following the shape of your jaw bone,  also draw a line around your nostril, make sure its on the same side as the jaw bone line.  Add a line down the centre of your nose and finishing at the tip and to finish line your lips.

White face paint, I bought a snazaroo cake bar from ebay for less than £3. Before you add the dots make a tear drop shapes under one eye and then with the back of a make-up brush or pencil add white dots all over your face, try to make them as opaque as possible.

Red Lipstick, I think this is step is self explanatory but apply red lipstick.  Once you have applied the lipstick add someone which highlights with the white face paint. 

Blue eye shadow, I used to blue eye shadow to fill in the tear shapes I made with the white face paint, try to use the brightest blue you have.  Once you have done that outline the tear shapes with a black liquid liner and you are finished. 


To complete the look add a black or dark brown bob wig or have a cute 50s hair style, I used 'Chestnut' wig from Geisha Wigs.


Saturday 27 September 2014

Simple Ombre lips ❤


Want your lipstick to make an impact? well try ombre lipstick, its simple yet effective and can make any simple make up look like you have spent hours perfecting it.  If you are new to this or not very confident in doing ombre lips a Matte lipstick might be easier for you as there is less blending and it lasts much longer.  


Products I used;
MUA lip lacquer in Criminal (available in superdrug) 
Black eyeshadow 
small eyeshadow brush 
concealer (optional)
concealer brush (optional)


  • Apply your make up as normal and then use a baby wipe or make up remover on your lips to make sure they are clean
  • Apply your matte lipstick/lacquer as normal, if needed apply lipliner before
  • Once your matte lipstick/lacquer has dried apply a black or dark eyeshadow in the outer corners only and blend gently 
  • If needed clean up the edges with concealer and a concealer brush 


Monday 15 September 2014

Flawless base for pale skin ❤

As you all know I am deathly pale, I am whiter than snow and finding foundation, concealer and powder matches has always been hard for me.  I have searched high and low in Superdrug and even gone to every high end counter in Manchester to find my perfect foundation and I think I have finally found the ones for me.

I have combination skin, I have dry spots on my nose and cheek and I do get a little bit oily on occasions on my t-zone.  Despite having dry spots I do like to have a matte foundation, not everyone likes matte foundations but I think it does work best for me.  All products I list may not work for you but the great thing about make-up is that if it doesn't work for you it can just be washed off!


Products I love for my perfect base;

Primers what work for me;
Benefit Porefessional
Revlon PhotoReady 
Maybelline Baby Skin 
Smashbox Photo Finish 

Don't forget before applying primer apply a moisturiser 20-30 minuets prior to help reduce foundation clinging to dry areas.

Concealer;
Collection lasting perfection concealer in Fair 
Illamasqua concealer in 115
MAC pro longwear concealer in NC15 (too dark for me but great coverage)

Contour and Bronzer; 
Collection Bronze Glow in Radiant 2
Illamasqua eye shadow in Heroine 

Foundation;
Revlon PhotoReady in 110 ivory 
Illamasqua Skin base in 02 

These are my holy grail base products, I am always on the lookout to add more items to my list so if you recommend any products for pale skinned ladies please comment them below.


Friday 5 September 2014

Long lasting make up ♥

Last Friday I went to a good friend’s wedding.  I was also the make-up artist for the bride, mother of the bride and bridesmaid.  That also meant that I had to be ready first and be in a full face of make-up for well over 12 hours. 


Products I used;

Base;
Johnsons daily essentials day cream
Revlon Photo ready perfecting primer
Absolute New York eyeshadow primer
MAC pro long wear concealer in NC15
ELF high definition powder in transparent
Revlon colorstay foundation in 110 ivory
MUA matte effect concealer in fairest
Illamasqua concealer in 115
Collection bronze glow mosaic bronzer in 2
Revolution vivid baked highlighter in golden lights
MAC vanilla pigment
Illamasqua eyeshadow in heroine
Revolution blush palette in hot lights

Brows
Brow bar to go
Elf brow mascara
MUA brow define mascara in fair

Eyes;
Illamasqua gel eyeliner in infinity
Revolution redemption palette in iconic 3
Naked basics; naked 2 and faint
Loreal colour infallible eyeshadow in 016 coconut shake
Lancome hypnose star mascara
Benefit they’re real mascara
GOSH gold glitter eyeliner

Lips;
Nivea pearl and shine lip balm
ELF long wear lip liner in Spice
Whitening lightening lipgloss in Coral Craze 


Here are a few photos of the lovely wedding and myself throughout the night with no make-up touch ups, as you can see my make-up lasted pretty well and it still looked good at the end of the night.  


When you need make-up to last long make sure you use products you know what work for your skin.   Don't try new products on event day or a few days prior to an event as it may cause irritation or not last as long as other products.


Friday 22 August 2014

Purple glitter smokey eye ❤


The last tutorial I did I got amazing feedback so I thought I would do another one this time more gothic and with glitter.  I hope you enjoy reading and find it helpful.


  • Before any smokey eye I always do my eyebrows first just so I have a better idea on how my make-up with look complete
  • Apply tape from the end of your eyelid to the end of your eyebrow and apply a eye shadow base or colour correcting concealer 
  • Apply your usual crease colour lightly, this step may seem pointless but it makes everything look better later
  • With a black eye liner pencil roughly liner line your lid and add black to the outer lid, it is hard to explain but you can see it in the picture.


  • Blend the eye liner with a brush and it should blend to a light black/grey colour, don't be tempted to rush and add more black straight away just keep on blending until you have a nice transition 
  • Once you have fully blended the eye liner slowly add black to the crease and blend, build up colour slowly until you have a solid black and blended crease
  • Pack a deep purple eye shadow on your lid, don't worry about fallout that can be cleaned up later
  • Blend the deep purple and black together to make it look seamless
  • You may thing this all looks a mess right now, trust me it will look fine soon!


  • Peel off the tape and clean up all the fall out with make up remover and apply your foundation.  Try and pick a foundation what gives you a flawless finish so all the attention is on your eyes and not any imperfections
  • Add a line of glitter glue then purple glitter to your lashline, any fallout can be brushed away
  • then the rest is up to you! contour, blush and lipstick is all up to your personal taste but I decided to go with light contour, peach blush and deep purple lipstick with a black lipgloss on top.

If you would like to see more tutorials comment bellow or send me a tweet!


Tuesday 19 August 2014

Get to know me more! | 25 random questions ❤

I've realised that you all don't know much about me so I thought I would answer 25 random questions I found on the internet.  Don't worry posts like this are not going to be a regular thing, I just wanted to mix things up.


Eye colour? 
My eyes are a mixture between green and blue.

Favourite colour? 
I have two favourite colours and they are black and pink.

Favourite TV series? 
I don’t have one favourite I have a few I love; Game of thrones, The walking dead, Sons of anarchy, RuPauls drag race and Masters of sex.

Can you describe yourself in three words?

Favourite animal?
Unicorn, yes they are real and so are dragons.

Do you like parties/social events?
Yes and no, I do love to have fun but I have social anxiety so I get very anxious at events.

Favourite band/artist?
I have a few; Bring me the horizon, The 1975, The Smiths and la dispute.

What qualities do you admire in a person?
Just the usual; good sense of humour, honesty, kindness and intelligence. 

Opinion on tattoos/piercings? 
Everyone has there own view on beauty, some people love tattoos and piercings and no one should be judged on there personal view on beauty. I chose to have tattoos and piercings because I love to have permanent art on my body and piercings don't last forever so I can take them out when ever I like.

Any pets?
I have two west highland terriers called Snowy and Willow.

Favourite film?
Pulp Fiction.

Ideal holiday/a place you would like to visit?
I want to go to New York and Vegas.

Lucky number?
13, I even have three Friday the 13th tattoos.

Last time you laughed very hard?
Today, I laugh a lot.

If you could be a superhero who would you be?
I would be a female version of Iron Man because Iron Man is successful, funny, rich and has a awesome suit!  

List 3 things you love?
Video games, make up and art. 

Favourite Perfume?
Dolce and Gabbana Light Blue, Vivienne Westwood Naughty Alice and Ghost Eclipse.

Favourite book?
The fault in our stars by John Green.

Right-handed or Left-handed?
I can use both hands but I mainly use my right.

How many pillows do you sleep with? 
Two and a giant Hello Kitty and Disney elephant which I cuddle in my sleep, sad I know.

Favourite flower?
I love white lilys and roses .

If you were a crayon what colour would you be?
I would be a white crayon, they are ignored a lot but if you use them they can be really useful and interesting.

Do you have a tan?
No! I'm ghostly white and I like it that way.

Last time you took a shower?
Today.

What’s your favourite drink? 
I'm addicted to drinking coke, I love it.


List some random facts about yourself below, I would love to get to know you all more!


Friday 15 August 2014

Harley Quinn Cosplay Makeup ❤

As you all know I am a little bit of a geek and when I had the opportunity to do a Harley Quinn look I just had to do it. If you don't know who Harley Quinn is she is character from Batman, she is The Jokers girlfriend and is featured in these video games; Batman: Arkham Asylum, Batman: Arkham City and others.


As you can see the look isn't the typical Harley Quinn makeup, I wanted something what looked evil but sweet at the same time. Special FX wax can be used to make the chelsea smile look more 3D and more realistic, I didn't use any this time as I did this late at night and I wanted to see if I could create it without any fake blood or FX wax.


Products used;
Revlon Colorstay 
Illamasqua concealer 
Illamasqua gel eyeliner in black 
black eyeshadow 
NYC eyebrow pencil 
essence matt lipgloss in red
MUA lip laqure in atomic 
illamasqua eyeshadow in heronine 
ELF HD powder 


Would everyone be interested in a in-depth tutorial in this or any other cosplay or even Halloween makeup please comment below or tweet me your requests and I will do my very best. 


Friday 8 August 2014

Ombre lips tutorial ❤


I have been asked a few times how I do my black and red ombre lips so I thought I would do a little step by step guide in how I do it and what products I used.  


  1. cover your lips with your foundation, concealer or lip eraser, this step isn't essential but it may help clean up later on!
  2. line your lips with a black lip or eye pencil and add extra black to the corner of my lips
  3. apply lipstick straight from the bullet or with a brush and blend the colours together with your lips 
  4. clean up is optional! if you want a precise look you can go back with your concealer brush and some concealer and clean up the edges
  5. next step is personal choice, I love to add gloss with any ombre look but that is totally up to you.


Products I used;
Jelly Pong Pong 2 in 1 eyeliner & shadow pencil in black
MAC Ruby Woo lipstick 
Gerard Cosmetics lipgloss in Candy Apple


I hope you enjoyed this tutorial, let me know if you try it out!